Experience SDK
![]()
artlabs Experience is the SDK for artlabs platform to enhance web applications with Augmented Reality (AR) and Virtual Try-On (VTO) capabilities. This library integrates various modules to provide a seamless experience in product visualization and interaction.
Installation
Via NPM
Install the ES module using npm:
npm install artlabs-experience
Via Script Tag
You can directly UMD build to your HTML page:
<script src="https://assets.artlabs.ai/js/experience/latest/artlabs-experience.umd.js" />
You'll need to paste script code before closing </body> tag of your web page.
Via Google Tag Manager
Alternatively, you can load and initialize the SDK using Google Tag Manager with a single Custom HTML tag. This method allows you to manage the SDK script and its basic configuration through your GTM interface.
1. Create a GTM Variable for your API Token (Recommended):
For easier management and security, store your Artlabs API token in a GTM Variable:
- In GTM, navigate to "Variables".
- Under "User-Defined Variables", click "New".
- Name your variable (e.g.,
ArtlabsAPIToken). - Choose "Constant" as the Variable Type.
- Enter your Artlabs API key in the "Value" field.
- Save the variable.
2. Create and Configure the Custom HTML Tag:
-
In your GTM container, create a new Tag.
-
Give it a descriptive name (e.g., "Artlabs Experience SDK - Load and Init").
-
Choose Custom HTML as the Tag Type.
-
In the HTML field, paste the following code. This will first load the SDK script and then initialize it using your GTM variable:
<!-- Load the Artlabs Experience SDK -->
<script src="https://assets.artlabs.ai/js/experience/latest/artlabs-experience.umd.js"></script>

<!-- Initialize the SDK -->
<script>
  // Ensure the ArtlabsExperience object is available after the script above has loaded.
  // Scripts in a GTM Custom HTML tag are generally executed in order.
  if (window.ArtlabsExperience) {
    window.ArtlabsExperience.init({
      token: '{{ArtlabsAPIToken}}', // References the GTM Variable you created
      // Add other common configurations from the Config section if needed
      // e.g., locale: 'fr'
    });
    console.log('ArtlabsExperience SDK Loaded and Initialized via GTM.');
  } else {
    // This might occur if the external script failed to load or GTM tag firing order is an issue.
    console.error('ArtlabsExperience SDK not found after attempting to load via GTM. Check script URL and tag sequencing if other tags are involved.');
  }
</script>
3. Set up a Trigger for the Tag:
- In the "Triggering" section of your GTM tag configuration, click to add a trigger.
- Choose an appropriate trigger. For loading and initializing the SDK, common choices are:
- DOM Ready: Fires once the HTML structure of the page is loaded.
- Window Loaded: Fires after all content on the page (including images and scripts) has fully loaded.
- Configure the trigger to fire on "All Pages" or only on specific pages where the SDK is needed.
- Save the trigger and then save your tag.
After these steps, ArtlabsExperience will be loaded and initialized on your specified pages. You can then interact with the window.ArtlabsExperience object from your website's JavaScript or from other GTM tags (ensuring correct tag sequencing if using other GTM tags for calls like startVTO or startAR). For example, to start a VTO experience based on a button click, you could have JavaScript on your page like:
// This script would be part of your website's code or in another GTM Custom HTML tag
// that fires after the SDK initialization.
// document.querySelector('#myVtoButton').addEventListener('click', function() {
//   if (window.ArtlabsExperience) {
//     window.ArtlabsExperience.startVTO('YOUR_SKU_HERE');
//   }
// });
Usage
To start using the library, you must import the ArtlabsExperience module in your JavaScript file:
import ArtlabsExperience from 'artlabs-experience';
Or, if you're using named exports:
import { init, startAR, startVTO } from 'artlabs-experience';
If you're using the UMD build, you can access the library via the global ArtlabsExperience object:
Then initialize the library with your token. It's a zero-config by default, but you can pass your configuration options as well. You can join the platform and get your API key at artlabs.ai.
ArtlabsExperience.init({
  token: 'YOUR_API_KEY_HERE',
});
Config
To initialize the ArtlabsExperience library with custom settings for the Augmented Reality (AR) and Virtual Try-On (VTO) experiences, pass the configuration options as shown in the example below. Modify the options to suit your application's requirements:
Common Options
| Option | Default Value | Description |
|---|---|---|
| locale | en | Sets SDK language. Accepts ISO language codes. Accepts ISO language codes. Available locales are; en, de, fr, es, it, nl, no |
AR Options
| Option | Default Value | Description |
|---|---|---|
| debugMode | false | Enables additional logging for debugging purposes. |
| showBanner | false | Controls the visibility of a banner in the AR experience. |
| bannerType | 'default' | The type of banner displayed in the AR experience. |
| bannerButtonText | 'Add to Cart' | The text of the banner displayed in the AR experience. |
| qrRedirectUrl | null | Custom URL for QR code redirection. When set, QR codes will redirect to this URL with the SKU as a hash parameter. |
VTO Options
| Option | Default Value | Description |
|---|---|---|
| debugMode | false | Enables additional logging for debugging purposes. |
| fontFamily | 'inherit' | The font family used in the VTO experience interface. |
| disableUI | false | If true, the default user interface for VTO will be disabled. |
| logoUrl | false | URL of the logo to be displayed in the VTO experience. |
| useWatermark | false | Determines whether a watermark is displayed in the VTO screenshot. |
| showBanner | false | Controls the visibility of action buttons in the VTO experience. |
| bannerButtonText | 'Add to Cart' | The text of the banner displayed in the VTO experience. |
| qrRedirectUrl | null | Custom URL for QR code redirection. When set, QR codes will redirect to this URL with the SKU as a hash parameter. |
Example Config
ArtlabsExperience.init({
  token: 'YOUR_API_KEY_HERE',
  config: {
    locale: 'en',
    vto: {
      fontFamily: 'inherit', // Customize the font for the UI
      disableUI: false, // Set to true to disable the default UI
      showBanner: true, // Set to true to display a banner in VTO
      bannerButtonText: 'Add to Cart', // Customize the text for the VTO banner button
      logoUrl: 'https://example.com/path/to/logo.png', // Provide a URL for your custom logo
      useWatermark: true, // Set to true to include a watermark in screenshots
    },
    ar: {
      debugMode: false, // Set to true to enable debugging
      showBanner: true, // Set to true to display a banner in the AR experience
      bannerType: 'default', // Specify a custom banner type,
      bannerButtonText: 'Add to Cart', // Customize the text for the AR banner button
    },
  },
});
It's also possible to update the configuration after the initialization:
// It's also possible to override the configuration options after the initialization
ArtlabsExperience.setConfig({
  locale: 'de',
  vto: {
    showBanner: true, // Set to true to display a banner in VTO
  },
  ar: {
    showBanner: true, // Set to true to display a banner in the AR experience
  },
});
Starting AR and VTO Experiences
Invoke AR or VTO experiences with product SKUs and configuration:
// Start AR Experience
await ArtlabsExperience.startAR('PRODUCT_SKU', {
  // Optional product metadata to show in AR banner
  product: {
    title: 'Product Title',
    subtitle: 'Product Subtitle',
    price: '100$',
  },
});

// Start VTO Experience.
// You can pass multiple SKUs as comma separated string or a single SKU
await ArtlabsExperience.startVTO('PRODUCT_SKU1,PRODUCT_SKU2,PRODUCT_SKU3');

// Stop VTO Experience
await ArtlabsExperience.stopVTO();

// Change product in experience
await ArtlabsExperience.changeProduct('PRODUCT_SKU4');
Events
There are multiple events that can be listened to. You can register an event listener via invoking the addEventListener method.
ArtlabsExperience.addEventListener('event-name', callbackFunction);
ArtlabsExperience.removeEventListener('event-name', callbackFunction);
| Event Name | Description |
|---|---|
ar-banner-click | Triggered when a user clicks on the AR banner. This event is dispatched with an object containing the sku of the product and the productConfig. |
vto-load | Emitted when the VTO experience begins loading. It signifies that the resources and assets for the VTO are being fetched and initialized. |
vto-change-product | Dispatched when there is a change in the product displayed during the VTO experience, allowing for dynamic updating of the product being tried on. |
vto-banner-click | Triggered when a user clicks on the VTO banner. This event is dispatched with an object containing the sku of the product and the productConfig. |
vto-screenshot | Sent out when the user clicks the shutter button and takes screenshot |
vto-stop | Sent out when the VTO experience is terminated, either by user action or programmatically. |
vto-error | Fired when an error occurs within the VTO experience. It sends a message detailing the error, which can be used for debugging or user feedback. |
Checking for AR and VTO Availability
Sometimes you may want to check if the current product has enabled AR or VTO experiences so you can show/hide relevant buttons.
You can do that by invoking the checkAvailability method.
const availabilityResult = await ArtlabsExperience.checkAvailability('SKU1');

// availabilityResult will be an object with the following properties:
// {
//   SKU1: {
//     ar: true,
//     vto: true,
//   },
// }
Bundle Size
You'll be consuming around 70kb minified and Gzipped or Brotli compressed versions, depending on the browser.
UX Recommendations
To provide the best user experience when integrating AR and VTO capabilities into your product pages, consider following these best practices:
- Clear Call-to-Action Buttons: Place AR/VTO buttons prominently near the product image or in the main action area.
- Visual Indicators: Use recognizable icons (e.g., AR glasses, camera) alongside text to make the functionality immediately apparent.
- Seamless Integration: Integrate the experience naturally within your product page flow rather than as an afterthought.
- Loading States: Implement clear loading states to indicate when AR/VTO experiences are being initialized.
Here's an example of a well-integrated product page example:
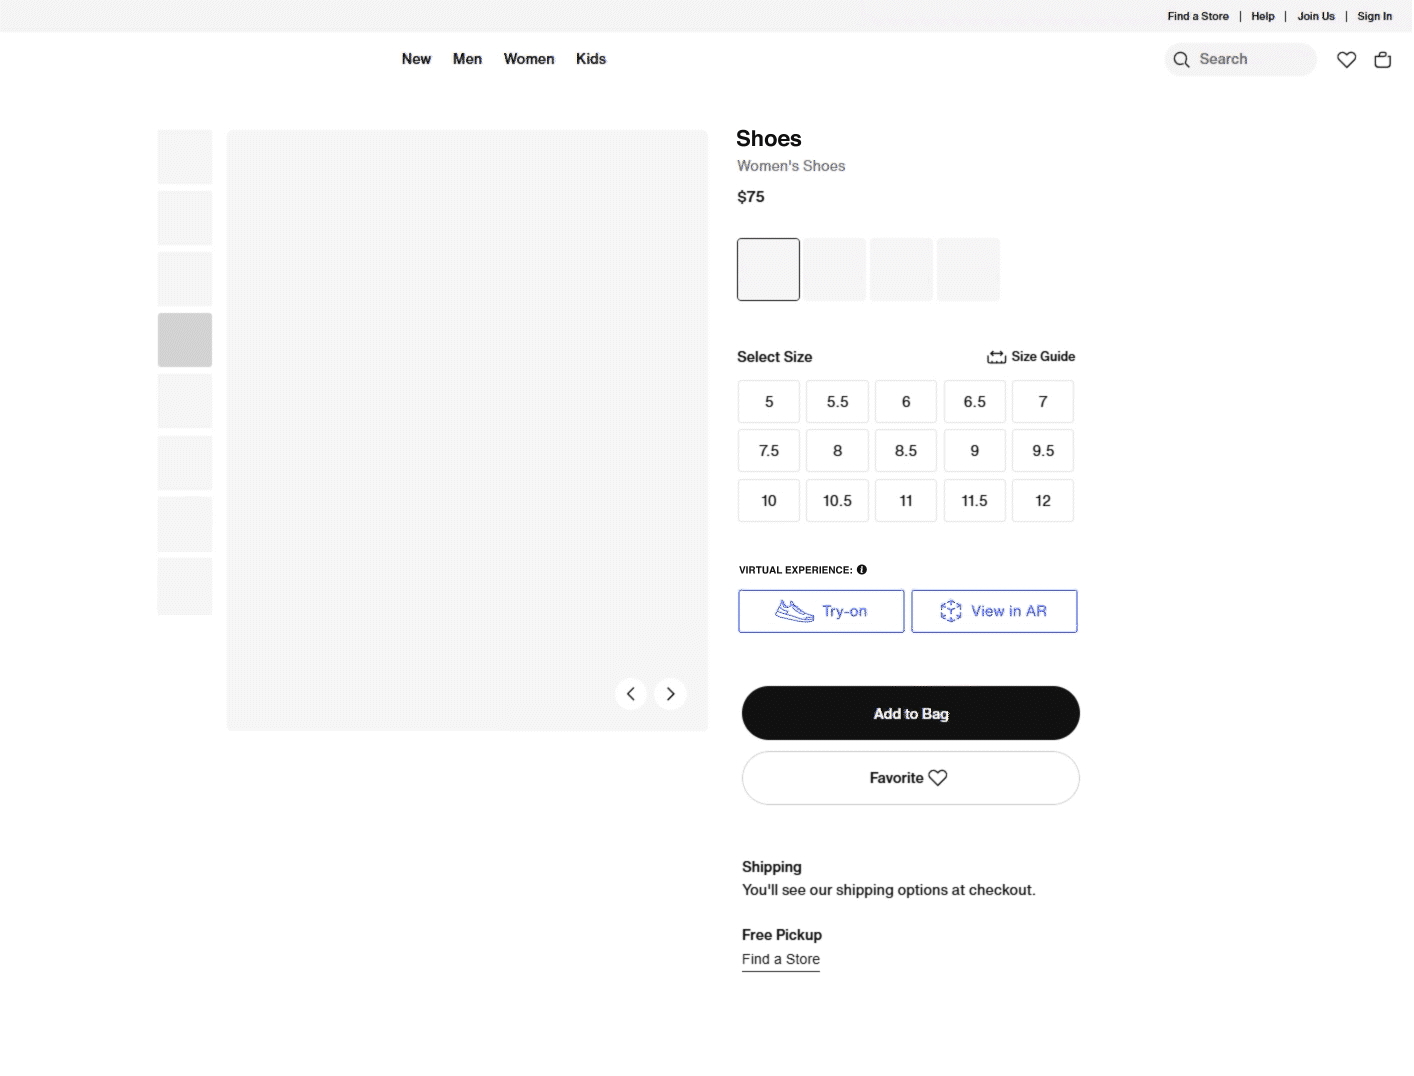
The example above demonstrates how AR and VTO buttons can be naturally integrated into the product page while maintaining the overall design aesthetic and user flow.
Desktop Behavior
As AR technology is only available on mobile devices, users on a desktop will need to be guided to their mobile devices. Both SDK's will do that for you on a desktop browser, using a runtime-generated QR code and a guidance popup.
QR Code Custom Redirection
By default, when users scan QR codes on desktop, they are redirected to the same page with hash parameters containing the SKU. However, you can customize this behavior to redirect users to a dedicated VTO or AR page.
When qrRedirectUrl is configured, QR codes will redirect to your custom URL with the SKU appended as a hash parameter. For example:
- If
qrRedirectUrlis set tohttps://example.com/vto-experience - The QR code will redirect to
https://example.com/vto-experience#artlabs-quick-vto=PRODUCT_SKU
This allows you to:
- Separate your main product page from the VTO/AR experience
- Avoid performance issues from running both 3D viewer and VTO simultaneously
- Create dedicated experiences optimized for VTO/AR